Uploading Your Own Image to SDSC Cloud Compute
Create or Update an Image
For small images (5-10 GB in size) you may be able to upload through the dashboard. Images should be converted to RAW format first. You can either create your own images or find pre-built images. For more information on creating your own images, you can use the Openstack image guide. For a list of example images, you can use Openstack's list of example images.
Upload an Image Using the Web Dashboard Interface
Recommended for images smaller than 5 GB.
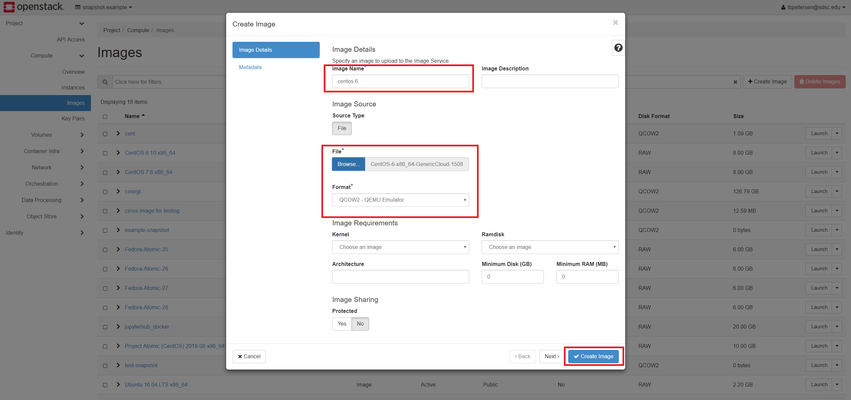
As an example for this guide, we will upload a CentOS 6 image from Openstack's list of example images.
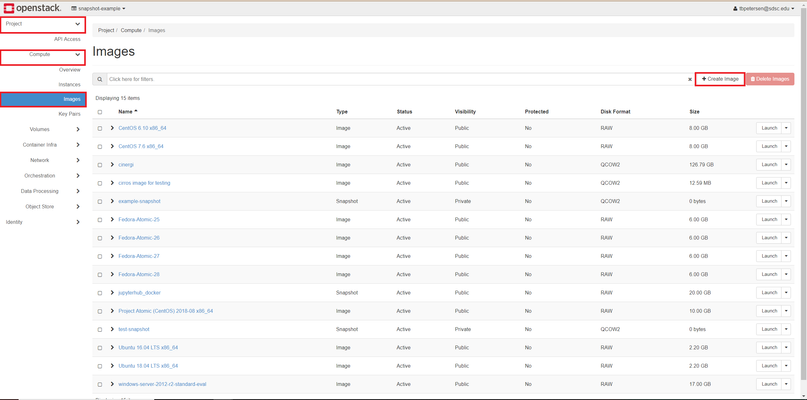
- From the dashboard, find the main menu on the left. Expand Project then expand Compute. Then click Images.
- In the Images section, click the Create Image button at the top right.
- In the popup window, enter a name for the new image. Then select the image file you would like to use and select its format. Finally, click the Create Image button. It may take a few moments to complete.
- Once you have created the image, it shows up in Project → Compute → Images with a status of "saving". It may take a few minutes to save. Note that the status will not update automatically when it changes, so you will need to refresh the page to see when the image is done saving.
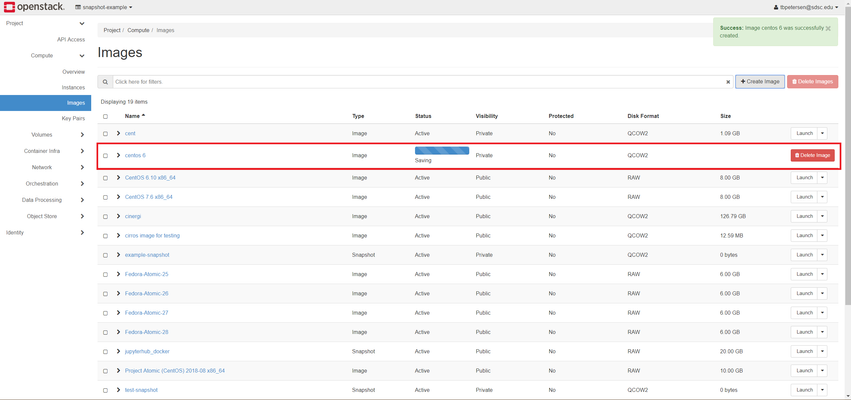
- Once the status has changed to "Active" then your image is ready to be used to launch an instance.
Create an Image Using the Client Tools
Recommended for images larger than 5 GB
Requirement: Python and Openstack Client packages
To create an image, use Openstack image create.
$ openstack image create imageName
To update an image by name or ID, use openstack image set.
$ openstack image set imageName
The following list explains the optional arguments that you can use with the create and set commands to modify image properties. For more information, refer to Image service chapter in the OpenStack Command-Line Interface Reference.
--name NAME

#The name of the image.

--disk-format DISK_FORMAT

#The disk format of the image. Acceptable formats are ami, ari, aki, vhd, vmdk, raw, qcow2, vdi, and iso. (SDSC prefers raw format for best performance on our disk backend)

--container-format CONTAINER_FORMAT

#The container format of the image. Acceptable formats are ami, ari, aki, bare, docker, and ovf.

--owner TENANT_ID --size SIZE

#The tenant who should own the image. The size of image data, in bytes.

--min-disk DISK_GB

#The minimum size of the disk needed to boot the image, in gigabytes.

--min-ram DISK_RAM

The minimum amount of RAM needed to boot the image, in megabytes.

--location IMAGE_URL

#The URL where the data for this image resides. This option is only available in V1 API. When using it, you also need to set --os-image-api-version. For example, if the image data is stored in swift, you could specify --os-image-api-version 1 --location swift://account:key@example.com/container/obj.

--file FILE

#Local file that contains the disk image to be uploaded during the update. Alternatively, you can pass images to the client through stdin.

--checksum CHECKSUM

#Hash of image data to use for verification.

--copy-from IMAGE_URL

#Similar to --location in usage, but indicates that the image server should immediately copy the data and store it in its configured image store.

--is-public [True|False]

#Makes an image accessible for all the tenants (admin-only by default).

--is-protected [True|False]

#Prevents an image from being deleted.

--property KEY=VALUE

#Arbitrary property to associate with image. This option can be used multiple times.

--purge-props

#Deletes all image properties that are not explicitly set in the update request. Otherwise, those properties not referenced are preserved.

--human-readable

#Prints the image size in a human-friendly format.
The following example shows the command that you would use to upload a CentOS 6.3 image in raw format and configure it for public access:
$ openstack image create --disk-format raw --container-format bare --public --file ./centos63.raw centos63-image