Table of Contents
| Table of Contents |
|---|
Account Setup
The SDSC Cloud team sets up accounts for customers. Please contact services@sdsc.edu to acquire an SDSC Cloud account.
Login to the Dashboard
In a web browser address bar, enter this link: https://dashboard.cloud.sdsc.edu
On the login page, enter username and password. Click "Sign In."
Note: The top of the window displays your user name in the upper right corner. You can access settings or sign out of the dashboard by clicking on your name.
...
Create an SSH Key (Key Pair)
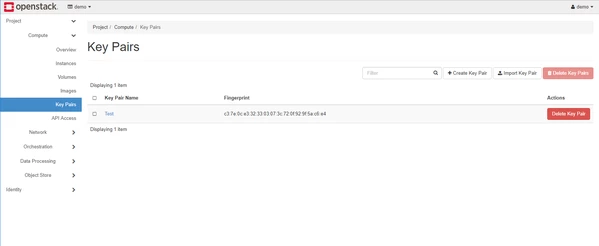
From the Dashboard, click on Compute for the scroll down menu, then click on Key Pairs.
From there, up at the top, click on Key Pairs, then click on +Create Key Pair. You will then be asked to give your Key Pair a name and a type. The Key Type is SSH Key. Once you have done so, click on Create Key Pair.
Once it's created, you will be redirected to a page that should automatically download Key Pair as a .pem file.

3. Your Key Pair should then appear on the list of Key Pairs you have created.
| Info |
|---|
...
The Key Pair will be used later to help set up the admin login to the new instance. |
Launch an Instance
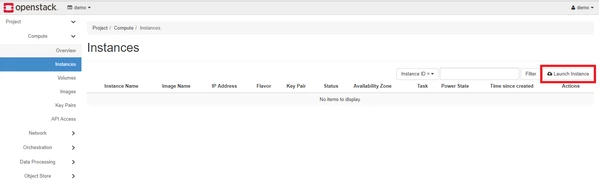
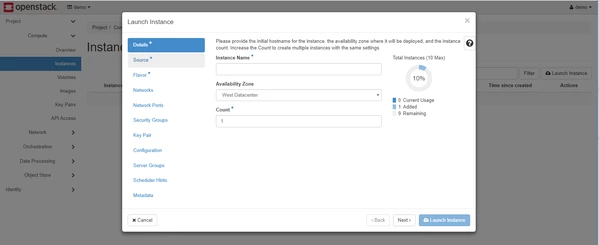
To launch an instance, click on Compute then click on Instances. Up at the top, select Launch Instance.
2. You will then be prompted through steps (click next after each one or click any categories on left to jump to that part):
Details:
Enter the name of your instance in the Instance Name text box.
Select West Datacenter from the Availability Zone drop down list.
Enter the number of instances you would like to create in the Count text box.
Source:
Select Image from the Select Boot Source drop down list.
Create New Volume toggle:
Yes will create a volume that can persist after deleting the instance. You will have to select a size for this volume
...
.
If you selected Create New Volume above, then use the Volume Size (GB) text box to enter the size in GB of the root disk volume.
If you selected Create New Volume above, then use the Delete Volume on Instance Delete toggle to select Yes and delete the root disk volume when the instance is deleted or select No and keep the root disk volume when the instance is deleted.
No (recommended) will create image size disk that will be deleted when you delete the instance. (You can attach additional volumes for additional persistent disk space.
Select a boot images from the list at the bottom of the window. Click the up arrow to select an image.
(Choose one of the 2 windows images you want to use)

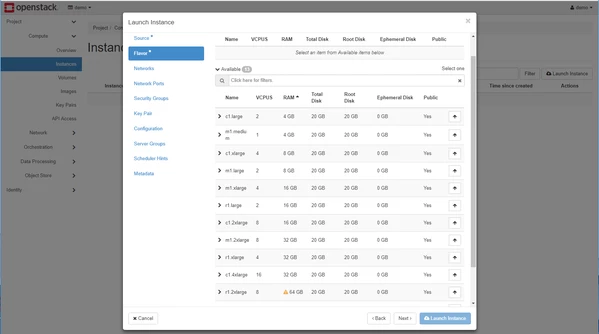
Flavor:
Select a Flavor from the list. Click the up arrow to select a flavor.
| Info |
|---|
...
For more information on which flavor size to select, please see Choose a Flavor Size |
...
. |
Networks: No changes should be needed
Network Ports: No changes should be needed
Security Groups:
RDP Security Group Rule (See below “Open up the RDP port to your instance (2 methods)”)
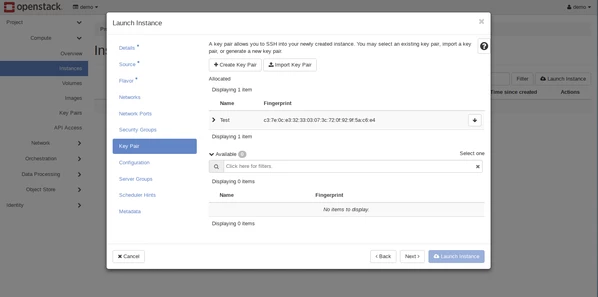
Key Pair:
Use the up arrow to select your SSH key pair from the list at the bottom.
...
3. Select the Launch Instance in the bottom right corner to start the instance.
Choose a Flavor Size
...
Choose a Linux Image
We currently have 2 Windows Images:
Windows 10 Enterprise
Windows Server 2019
Both Images will automatically obtain licenses from campus on build.
Open up the RDP port to your instance (2 methods)
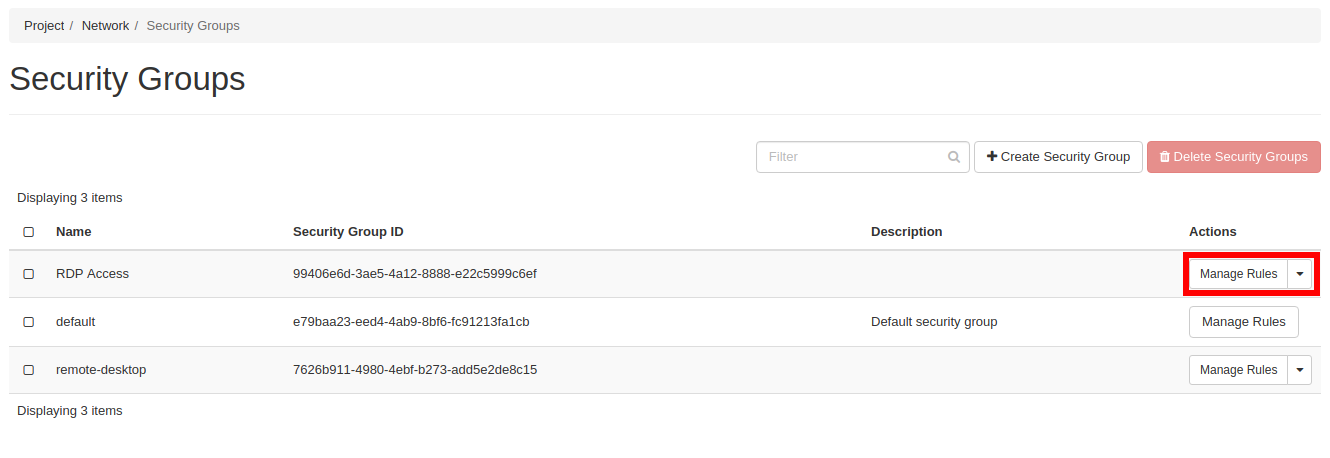
Adding RDP to your existing "default" security group (not preferred):
1.Go to Network→Security Groups tab. Click "Manage Rules" on the "default" group
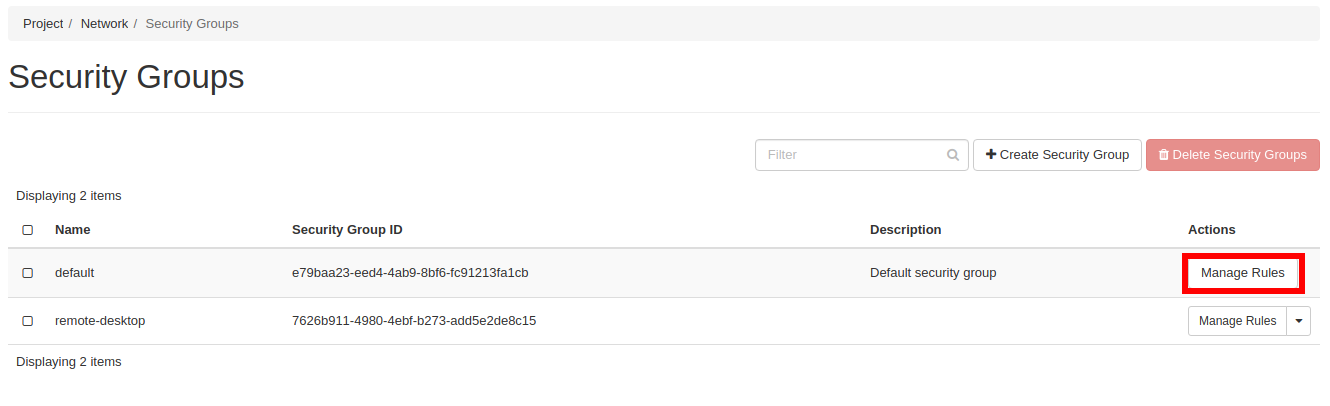
2. Click the "+Add Rule" button at the top
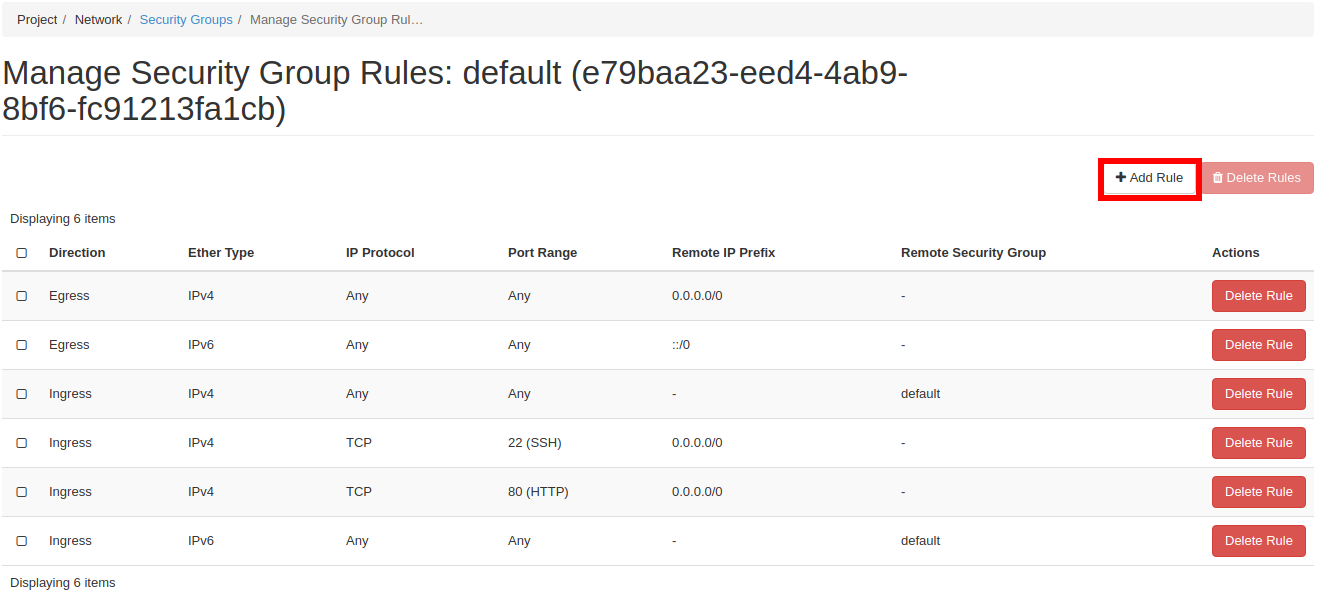
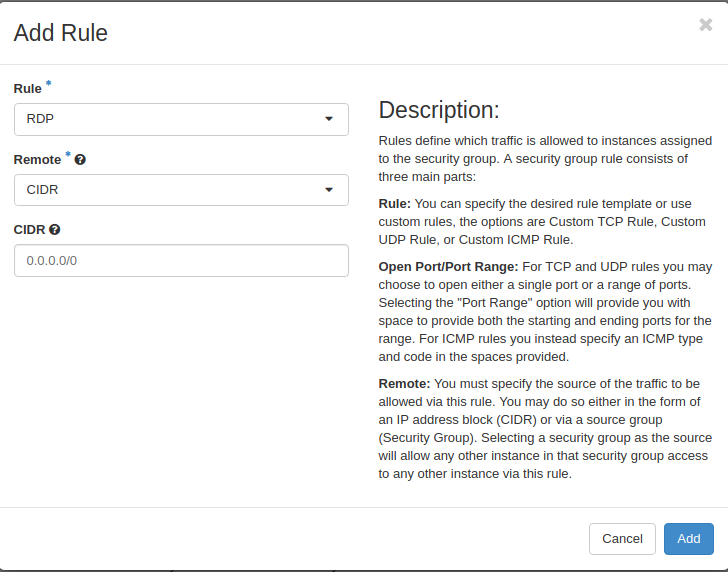
3. Select RDP from the rule drop down (leave CIDR as 0.0.0.0/0. this allows from everywhere, or you can be more specific)
4. Click "Add"
Create a new security group for RDP and apply to your instance (preferred method):
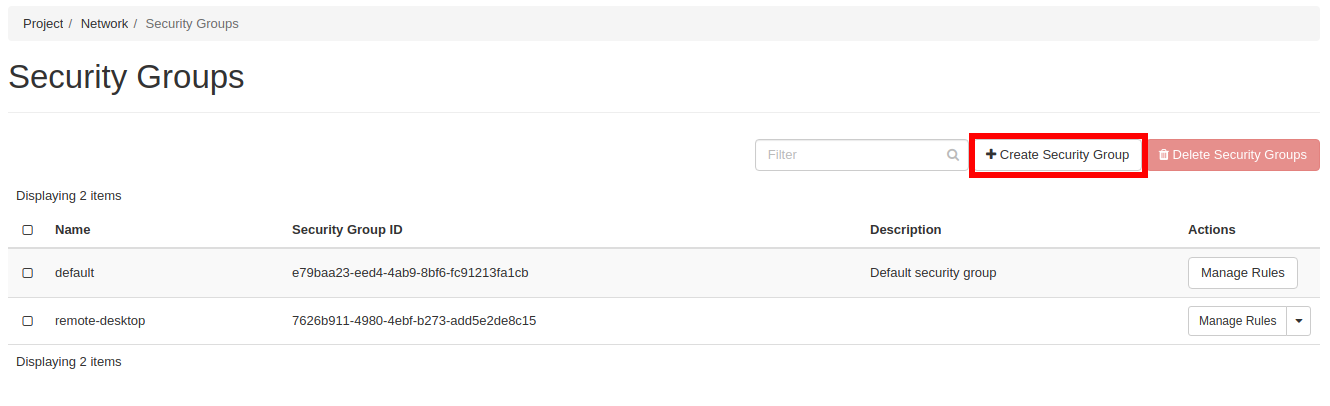
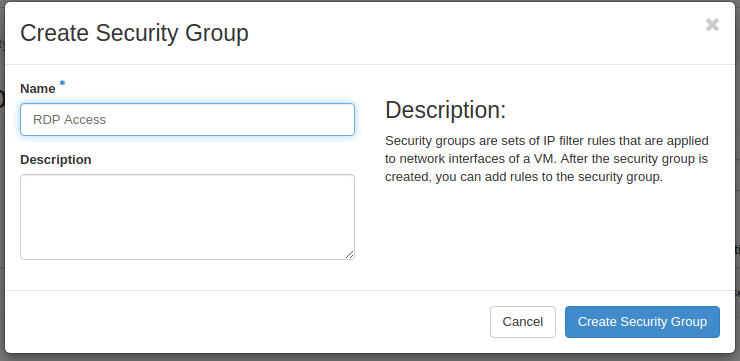
Go to Network→ Security Groups tab. Click "+Create Security Group" button at the top
2. Give it a name. (eg: RDP access) and click "Create Security Group
3. Click "Manage Rules" for the newly created group
4. Click the "+Add Rule" button at the top
5. Select RDP from the rule drop down (leave CIDR as 0.0.0.0/0. this allows from everywhere, or you can be more specific)

6. Click "Add"
Attach new Rule to your instance:
1.Go to the Compute→Instances tab
2. Find your Windows instance and click the pull down arrow on the right, and select "Edit Security Groups"
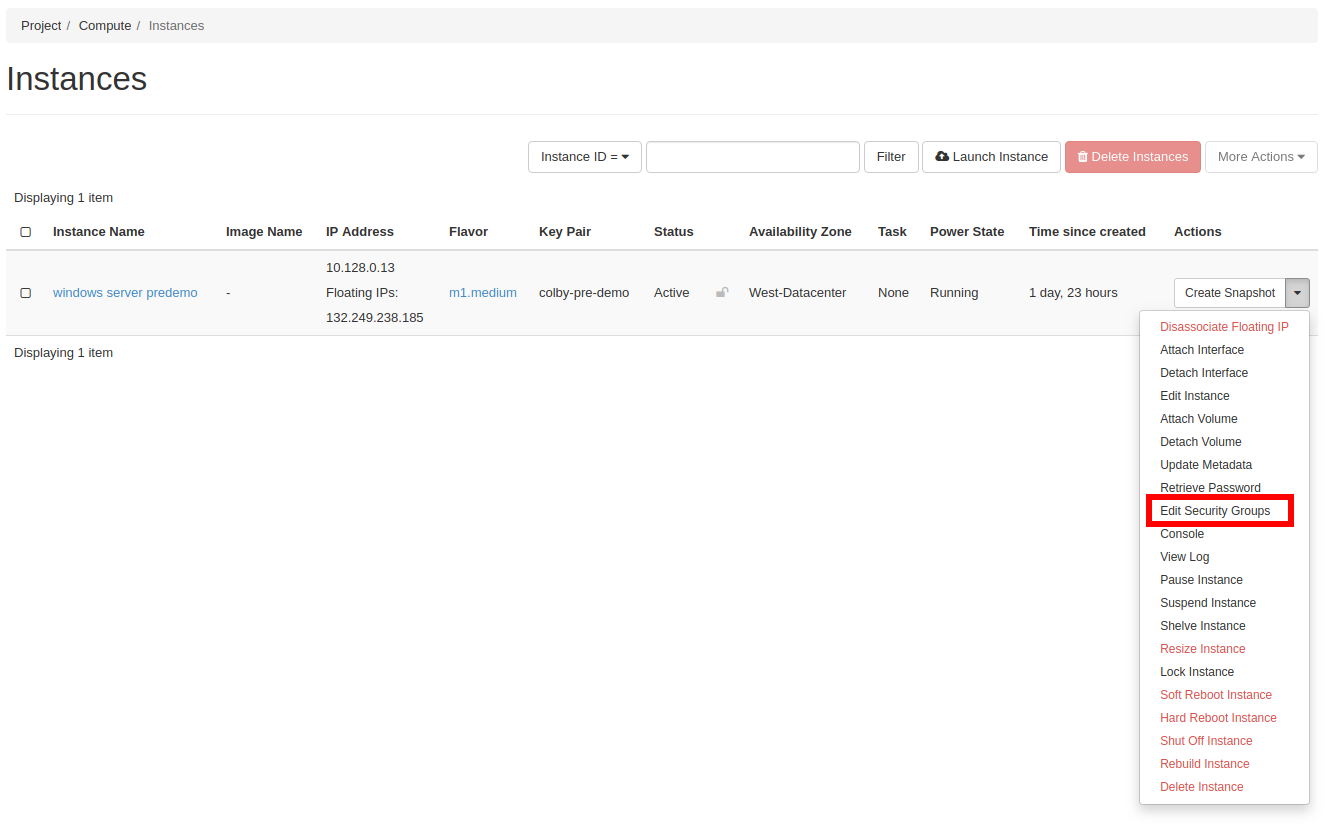
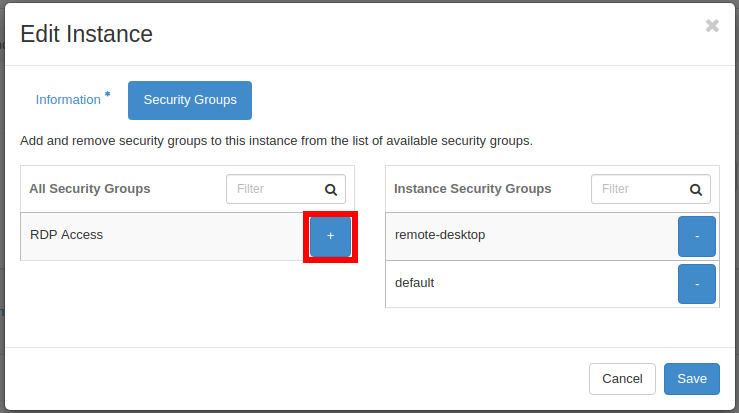
3. Add your newly created security group (press the blue plus sign) and then hit "Save"
4. This method is preferred because it does not open RDP to all instances, only those you attach this group to
Assign a Public IP Address
To assign a public IP address, under Compute, then Instances, select the drop down menu next to Create Snapshot of the
Instance you want to assign the IP address to. In the drop down menu, select Associate Floating IP.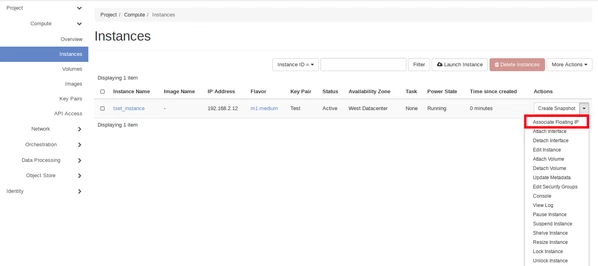
A window will come up. Select the plus box next to Select an IP Address.

3. Another window will come up and from there select Allocate IP.
...
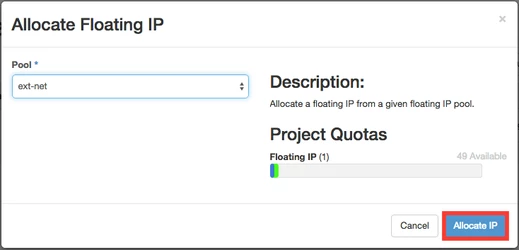
4. An IP Address will then be allocated, and should appear in the IP Address box. Select Associate to finish.
...
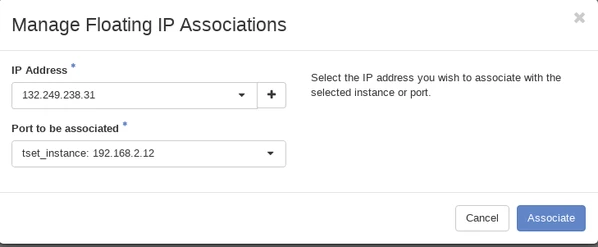
If a Floating IP address already existed, you may select it initially and click Associate.
How to access your Windows Instance:
Get the password for the default user "Admin" to log into your instance. This require access to your key associated with the key pair attached to your instance:
Get the password through the dashboard:
1.Find your instance on the Compute→Instances page
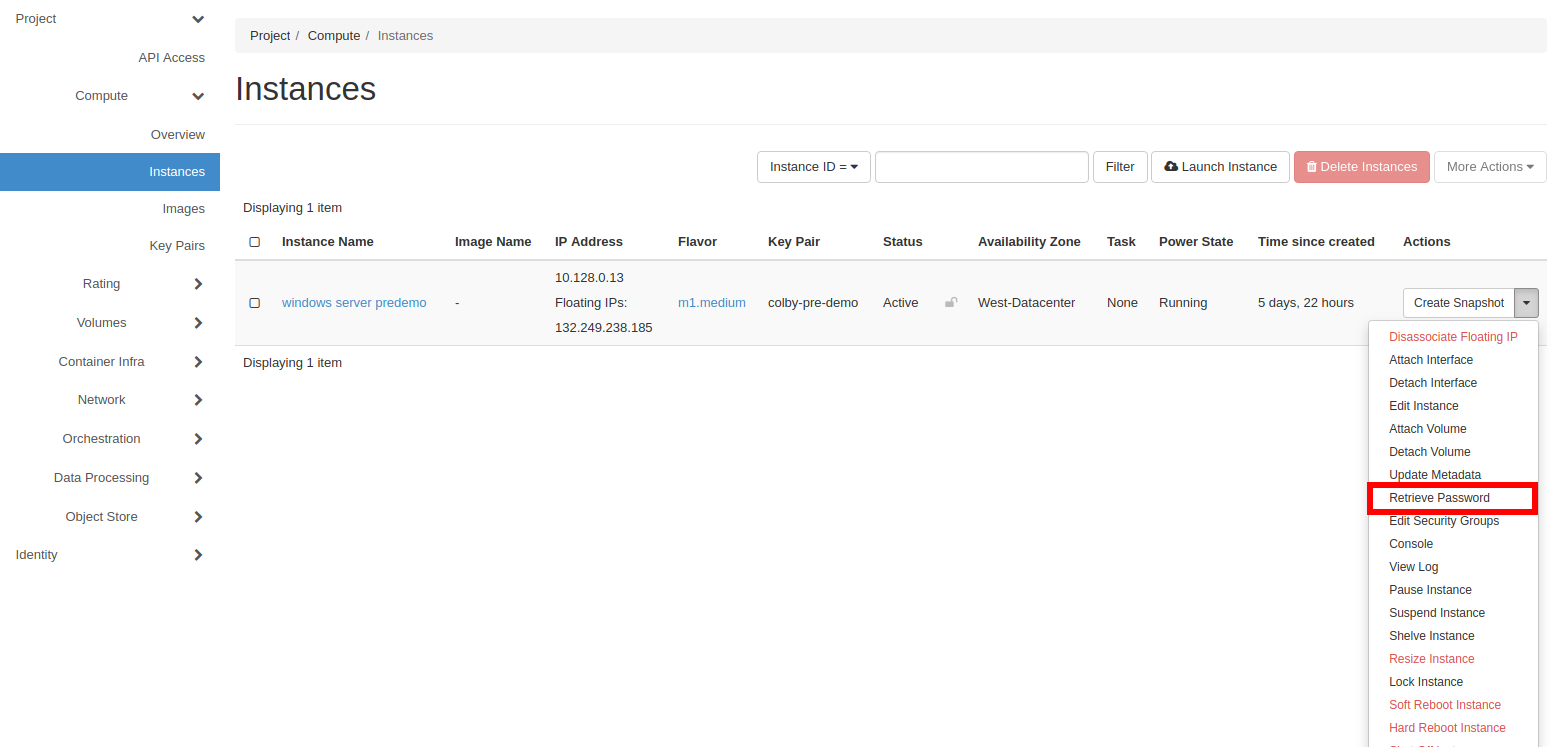
2. Click the pull down arrow on the right and select "Retrieve Password"
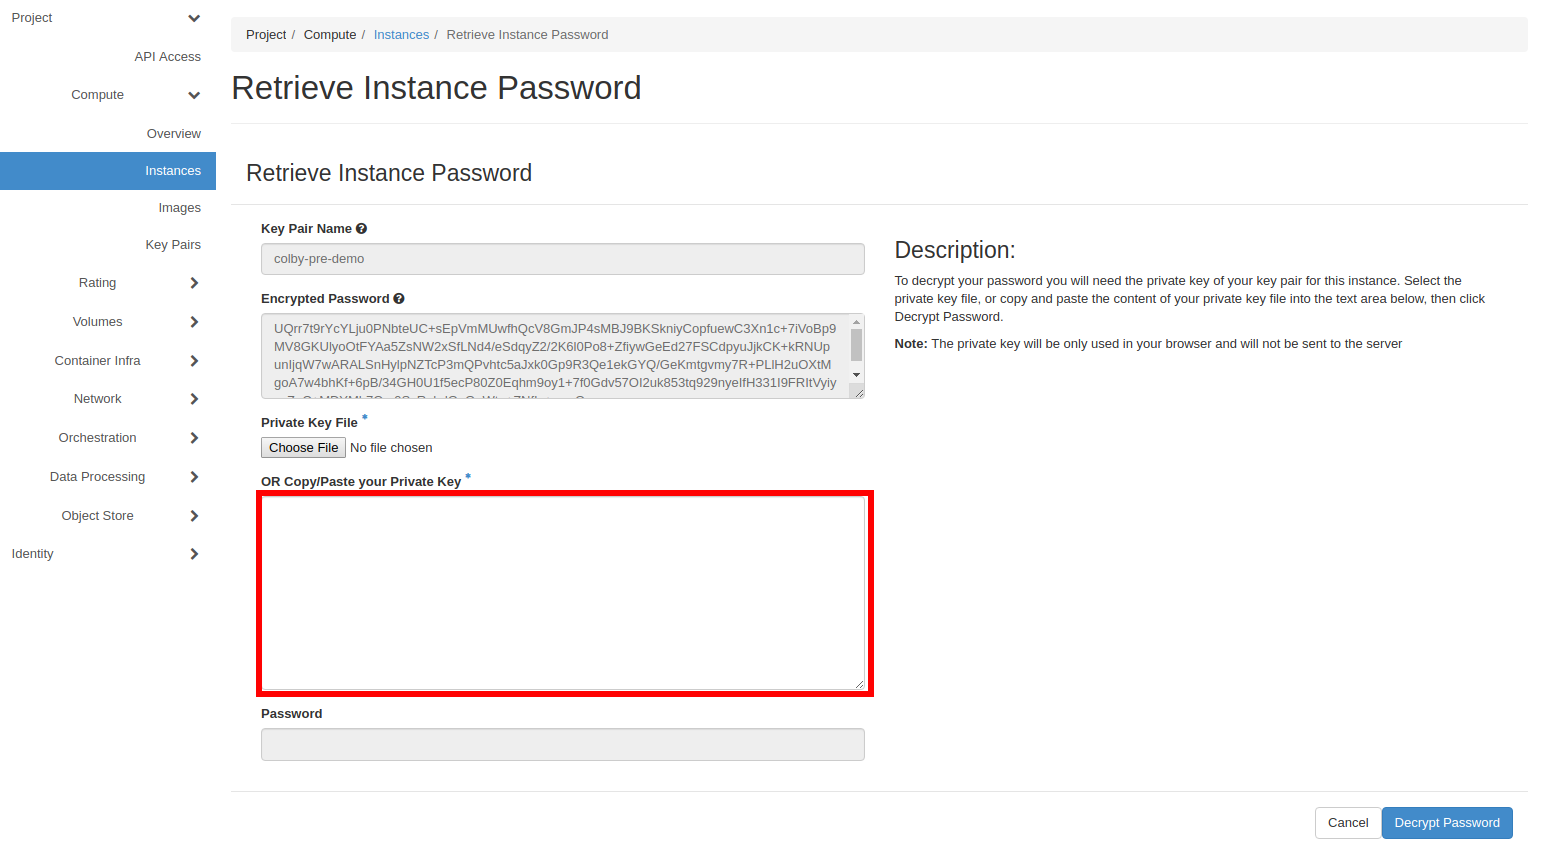
3. Obtain the text of your ssh key associated with the instance
If downloaded the key from the dashboard when you created it then you can just copy the contents of the .pem file and paste into the form or point it to the pem file with "Choose File" button
If you have a password protected key (you imported a key into keypairs) you need to get the key contents from the command line with the following command:
openssl rsa -in <your key file>
This will output the contents of the key that you can paste into the form

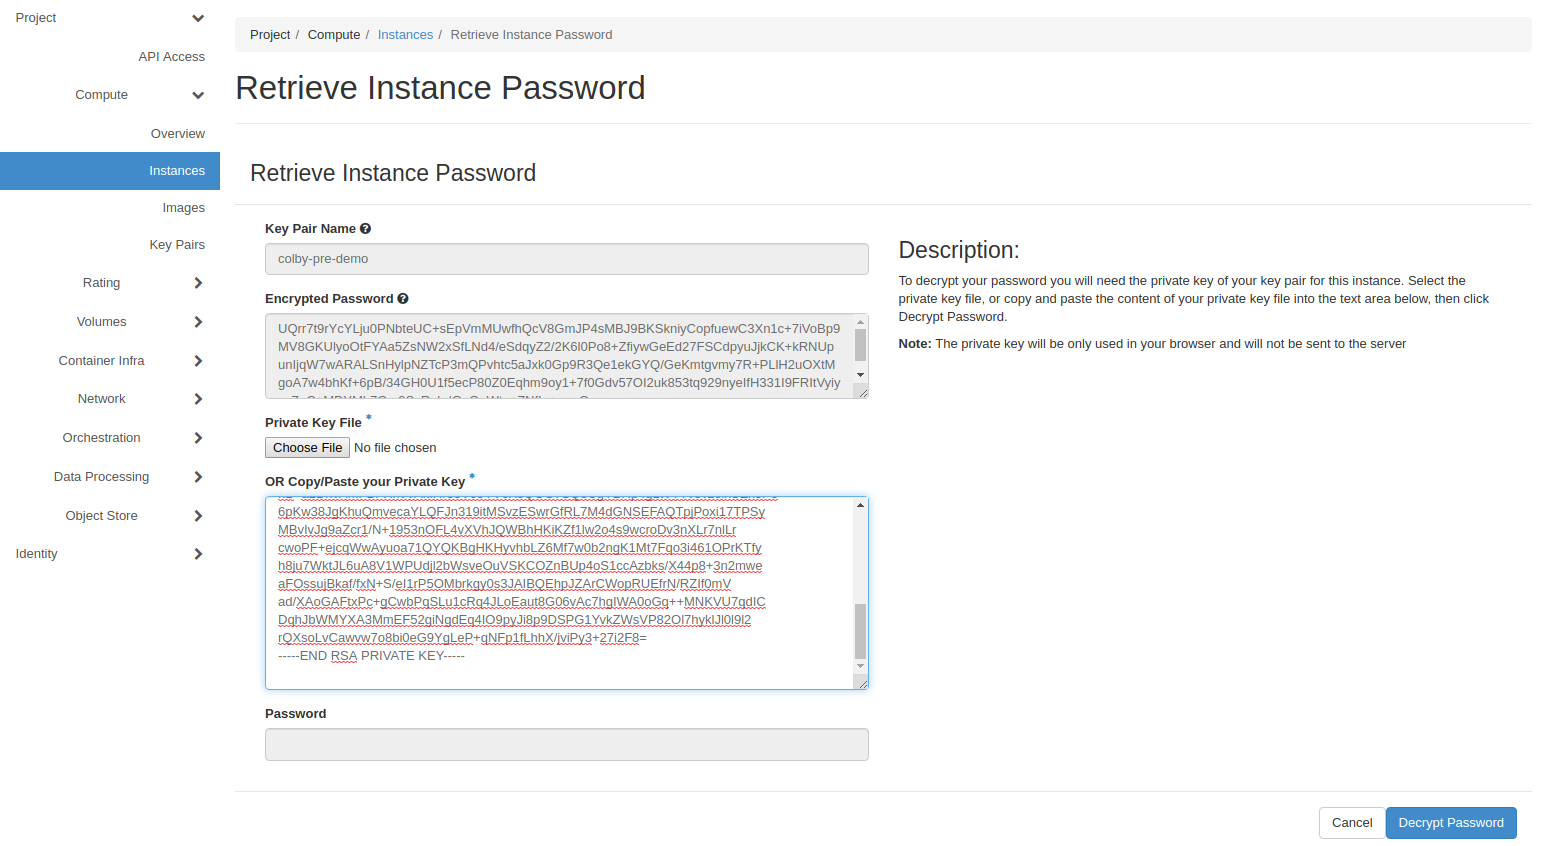
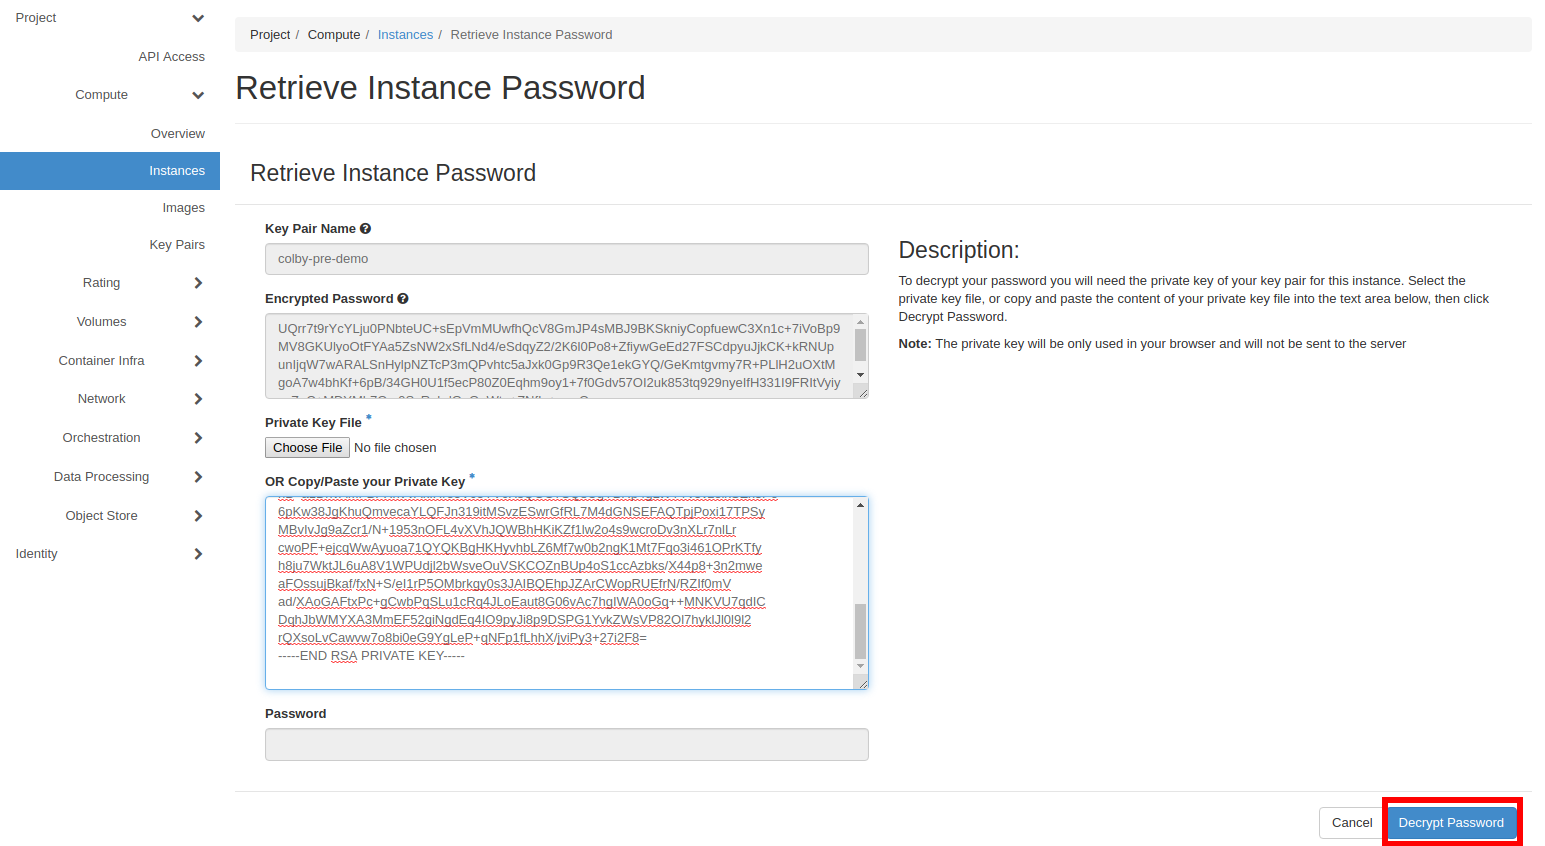
4. Paste into the form
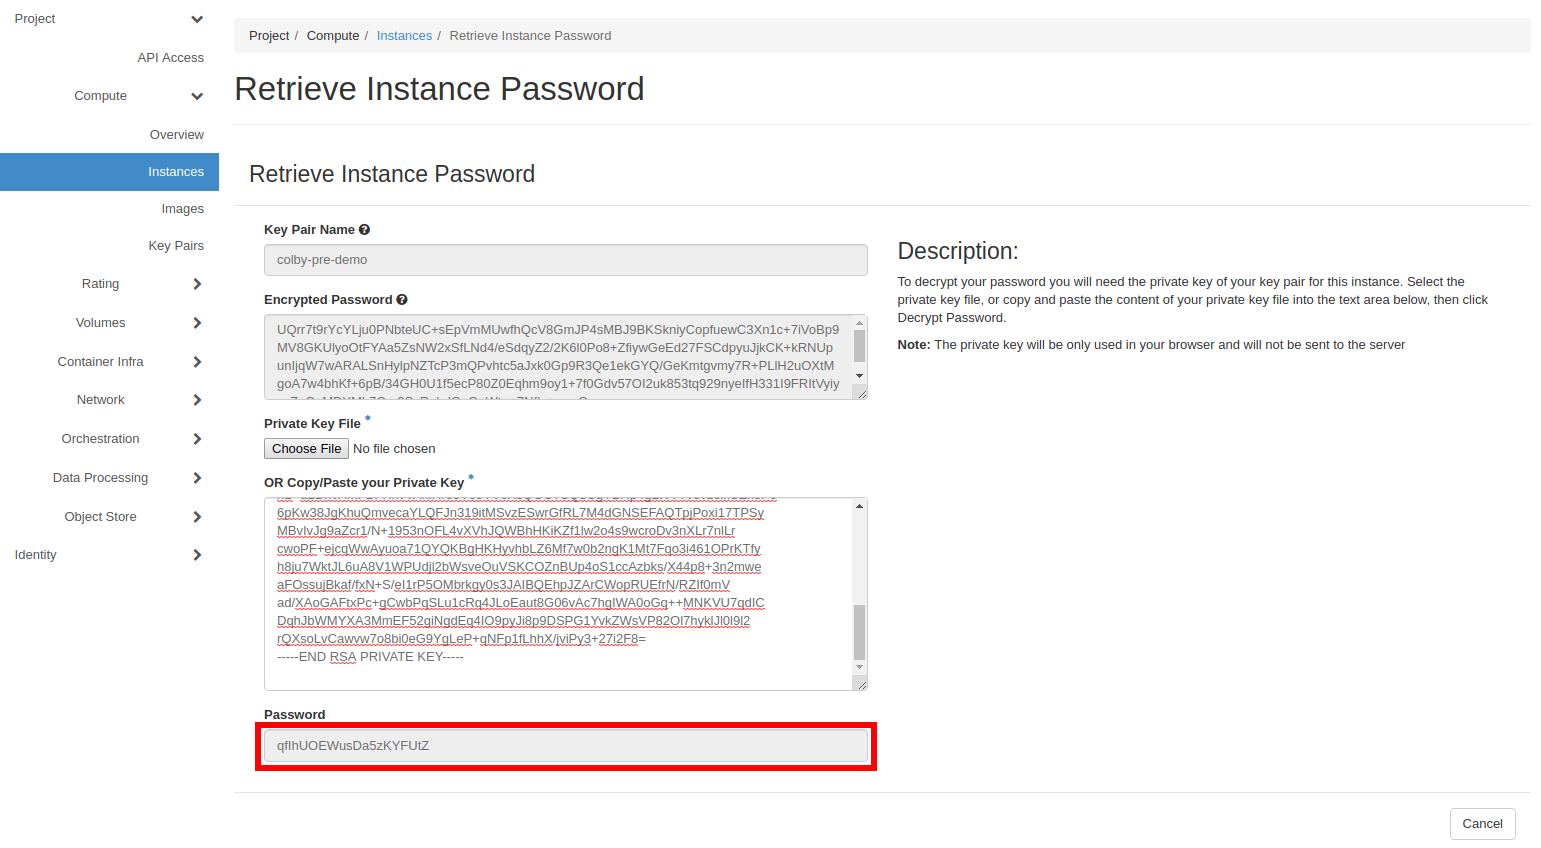
5. Once input into the form, click "Decrypt Password"
6. The windows "Admin" password will show on the bottom field labeled "Password"
Remote Desktop to the Instance floating ip address:
If you don't have a floating ip address on the instance you need to add one:
Use the user: Admin
Use the password you just obtained
| Info |
|---|
Note: When trying to RDP from off-campus, a UCSD VPN must be used. |
Have Questions?
SDSC Cloud FAQs
| Filter by label (Content by label) | ||||||
|---|---|---|---|---|---|---|
|
Email SDSC Support
Email support@sdsc.edu for assistance from SDSC Cloud engineers.